I thought I would share today a handful of layouts I completed at a crop I attended last month. As I was going through them, I noticed a circle trend on these particular pages. I will admit it... I'm a bit addicted to them. They just catch my eye--maybe in the same way that Walt Disney realized their appeal with Mickey Mouse.
For this one I used a full-sized, pre-cut Cicle by My Mind's Eye Lime Twist and again for the rosette to mimic the feel of the giant lollipop my husband brought us from Paris...
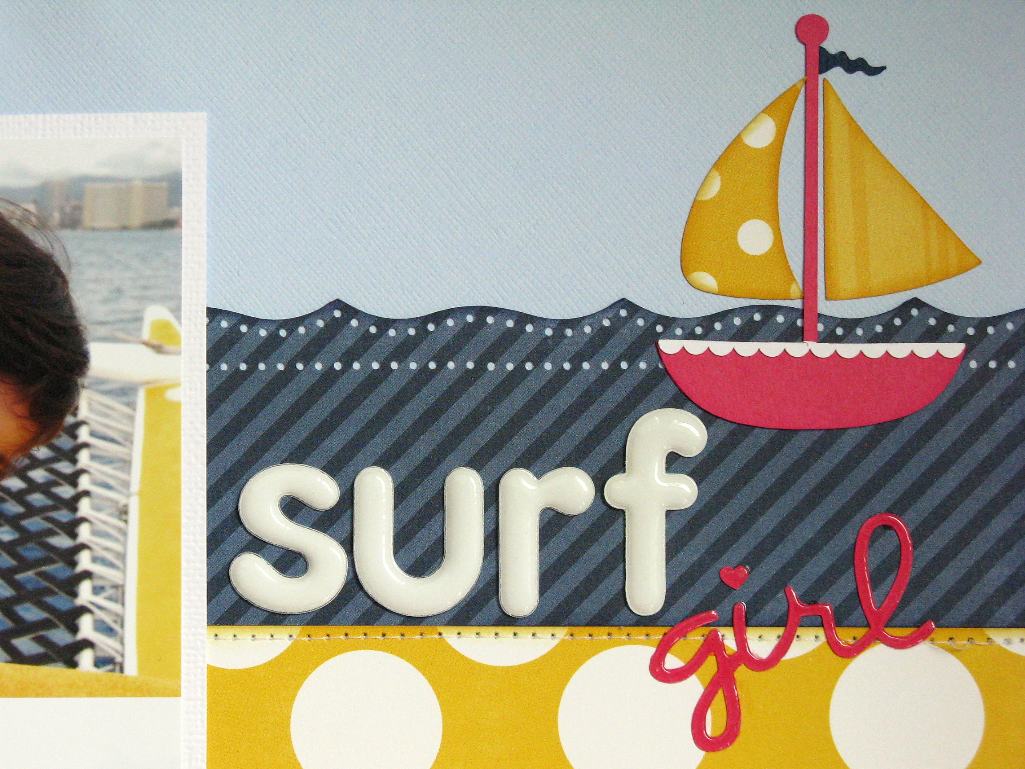
For these photos, I found a sketch by Valerie Salmon that caught my eye over at Got Sketch. I loved the use of the half circle and cropping one my photos into a circle... (the sailboat, scalloped circle border and the word "girl" were all cut out on my Silhouette). Patterned Papers by Echo Park.
This is another fun sketch I found using circles in the background. I love how the pumpkins by Lori Whitlock (once again used with my silhouette) just happened to match my daughter's shirt in the photo! Patterned paper by Echo Park.
For this last page I turned the October Afternoon banner paper into an actual half-circle nautical banner. I am always attracted to banner patterned paper, but sometimes find myself struggling to find the perfect way to feature it on a layout without everything getting too busy and this was the perfect solution. I just found a circle punch that fit the banner on the patterned paper and then punched them and folded them over the twine.
Thanks so much for stopping by. I hope you will be inspired to add some circles to your next papercrafts project! :)
Tuesday, June 26, 2012
Tuesday, June 19, 2012
Make It Monday #71- Bordered Sentiments
After many weeks of good intentions, I finally found time to play along with this week's Make-it-Monday challenge over at Nichole Heady's blog found here. Betsy showed us how to mask off an area on our cards to allow our sentiments take center stage!
I orginally hadn't planned to have my design so closely resemble Betsy's idea for her card, but after a little stamping accident in my top left-hand corner, I decided a strip of contrasting paper down the side was just what I needed to salvage this project. ;)
I used the "In the Meadow" dies (cut once on each side) to form my curved mask for my sentiment which unfortunately may have been more dramatic had it not been for my boo-boo.
Papertrey Ink Supplies:
Papertrey Ink Beautiful Butterflies Stamps
Papertrey Ink Background Basics Gingham Stamp
Papertrey Ink A Big Thank You Stamp
Papertrey Ink Butterfly Die
Papertrey Ink Pinking Sheers Border die
Papertrey Ink In the Meadow die
Papertrey Ink Simply Chartreuse Felt
Other Supplies:
Cardstock- Neenah Solar White
Polka-dot Stamp- Impression Obsession
Aqua Ink- Ranger Adirondack "Aqua"
Green Ink- Distress Ink "Crushed Olive"
Grey Ink- Versafine "Smokey Gray"
Baker's Twine- The Twinery
Rhinestones- Queen & Co.
Pen- Marvy "Ash Grey"
Thanks so much for stopping by and make sure to check out more fabulous creations inspired by Betsy's challenge here. :)
Monday, June 18, 2012
Two Final Craft Warehouse Layouts...
Well, as my term with Craft Warehouse officially draws to a close, I am finally getting around to posting my last two layouts I created for them...
We had the pleasure of working with a variety of different products on this particular assignment. It's almost like they were trying to get as many unique displays as possible out of us before wrapping up as they have decided to discontinue the design team as we know it and switch to guest designers on their blog instead. ;)
My first layout uses paper and cutouts from EK Success' new Disney Paper pad and matching embellishments...
For this Donald Duck, the cutout was of a grouchy, mad Donald Duck which didn't fit with the mood of my page so I fussy cut him out and then cut a Donald Duck head from the patterned paper to use over the top instead. Since the other head was a bit oversized, I popped it up on a pop dot for a bobble head effect. My six year old thinks he's so funny.
"Star Spangled Sweeties" Supplies:
We had the pleasure of working with a variety of different products on this particular assignment. It's almost like they were trying to get as many unique displays as possible out of us before wrapping up as they have decided to discontinue the design team as we know it and switch to guest designers on their blog instead. ;)
My first layout uses paper and cutouts from EK Success' new Disney Paper pad and matching embellishments...

For this Donald Duck, the cutout was of a grouchy, mad Donald Duck which didn't fit with the mood of my page so I fussy cut him out and then cut a Donald Duck head from the patterned paper to use over the top instead. Since the other head was a bit oversized, I popped it up on a pop dot for a bobble head effect. My six year old thinks he's so funny.
For the second layout, we were each given a different Echo Park mini kit to work with. I was given their 4th of July kit which was perfect since I had a plethora of 4th of July photos from several years just waiting to be scrapbooked. :)
Thanks for stopping by and make sure to check out the gallery pages featuring all of my fellow designers inspiring work for this assignment here. I am so happy I had the honor of working with each of them and I thank Craft Warehouse for the opportunity! :)
"Donald Duck Love" Supplies:
Patterned Paper- EK Success
Cardstock- Bazzill (orange/navy), American Crafts (white)
Cutouts- EK Success
Alphas- American Crafts Thickers
Circle Punch- EK Success
Baker's Twine- We R Memory Keepers
Washi Tape- Queen & Co.
Ink- Colorbox Fluid Chalk Ink
White Gel Pen- Uni-Ball Signo
Free Font- Donald
Patterned Paper- Echo Park
Cardstock Stickers- Echo Park
Alphas- American Crafts Thickers
Ribbon- American Crafts
Wood Veneer Stars- Studio Calico
Rhinestones- Queen & Co.
Pearls- Queen & Co.
Glitter Glue- Ranger Stickles (star dust)
White Wash- Ranger Distress Stain (picket fence)
Staples- Tim Holtz Tiny Attacher
Ink- Colorbox Fluid Chalk Ink
Other- Thread
Saturday, June 9, 2012
A Home Decor Canvas Project
I made this canvas as part of my final Craft Warehouse assignment as our design team term comes to an end. :(
For this project we were asked to feature the 4" foam alphabet craft stamps on a Canvas project along with the Tim Holtz Resist Kraft Paper, Distress Stain (I had Fired Brick) and his mini plaquettes. In addition to these supplies, we were also asked to use the clothes pin, burlap ribbon and Flower and some canvas and burlap tags
For my foam letters I stamped them with versafine black ink on the backside of some of the Tim Holtz Resist Kraft Paper. I like how this ink give crisp clean lines and a true black color. For the rest of the title I used some American Crafts Thickers. I accidently started to apply them too low on the canvas and when I tried to pull them up, they pealed off my paint so to cover my mistake I added the line of black cardstock. Wasn't part of my original design, but it turned out to be a happy accident--My daughter says it's her favorite touch. :)
As much as I love many of Tim Holtz's products, he and I have very different styles so I tried my best to take these materials and interupt them in my own unique way. I had just been inspired by watching this season's Design Star on HGTV (for those who don't have HGTV, you can see the full length episodes online here).
Anyway, I took inspiration from their white box challenge and used 1" blue painters tape to create bold stripes for the bottom part of my canvas project. Before doing this the top of the project felt visually heavy and I like how adding the bold black stripes to the bottom balanced it out. Unfortunately the paint was a little runny and bled through a bit, but the tan was a custom mixed color so I'm doing my best to ignore it. ;)
Rather than using the Canvas and Burlap tags as they were, I took them apart, stained them black and red and then diecut them into circles and the heart (and put a little bit peaking up behind the "o" and "e". That Distress stain is so cool, but I felt like I was at the site of a brutal murder with the fired brick and my stained hands (I admit I watch too many Crime dramas). :)
Thanks for stopping by. Make sure to drop back in when I post my final two layouts I created for this assignment.
Supplies:
Kraft Paper- Tim Holtz Kraft Resist Paper Pad
Black Cardstock- Bazzill Basics
4" Foam Alphabet Stamp Set- Creative Café
Burlap Flower- Canvas Home Basics
Burlap & Canvas Tags- Canvas Home Basics
12x12 Canvas- Sierra Pacific
Black Foam Alphas- American Crafts
White Crocheted lace- American Crafts
Pearl Brad- American Crafts
Heart Die- Sizzix Tim Holtz Mover & Shapers
Border Punch- Martha Stewart
Tim Holtz idea-ology Numeral plaquettes
Ranger Fired Brick Red Distress Stain
Glue- Beacon’s 3-in-1 Advanced Craft Glue
Black Ink- Versafine Onyx Black
Paint- Ceramcoat (and 1" blue painters tape)
White Embroidery Floss- DMC
Other: Clothespin, burlap ribbon and jute cording
Wednesday, June 6, 2012
Three Teacher's Gifts
Today I am sharing three little teacher's gifts I made. I kept them fairly quick and simple, but they were fun to make and easy to do with leftover scraps (for the last box that's exactly what I used). For the first two I made them at a crop for a last minute challenge where I had limited supplies on hand--Mostly just the darling packages of paper I had purchased minutes before and whatever I could dig up from the bottom of my crop bag. LOL! :)
For my daughter's Kindergarten teacher I made a plaque. I thought it could either make a good hallpass or just something for her to hang next to her desk...
Then my oldest daughter has two teacher's: One who teaches math and science and the other that focuses on reading and writing. It was fun doing one with a feminine take and one that was a little more masculine (which is seriously a challenge for me).
I LOVE this latest Hello Summer Collection designed by Lori Whitlock for Echo Park! :)
For this one, you can see I used the scraps from the journal that I posted here. I had some strips left from the chevrons that I created and they were the perfect width for the sides of this little post-it note box! Love those happy discoveries! :)

Supply Lists:
"Miss Price" Plaque
Patterned Paper- My Minds Eye Sunny Side
Ribbon- American Crafts
Pearl & Rhinestone- Queen & Co.
Twine- Twinery Cappuccino
Flower- Prima
Colorbox Chalk Ink
Alpha Dies- Cricut
Unfinished Plaque- Sierra Pacific / Craft Warehouse
Ms. Tendler Mini Box
Patterned Paper & Stickers- Echo Park Hello Summer
Chick Stamps- Lawn Fawn Critters on The Farm
Twine- Twinery Mandarin
Ribbon- May Arts
DIY Box- Sierra Pacific / Craft Warehouse
Mr. Nadal Mini Box
Patterned Paper- Echo Park Note To Self
Thanks Stamp- Papertrey Ink Think Big Favorites #1
School Stamps- Technique Tuesday Ali Edwards I Love School
Red Ribbon- May Arts
Pen- Red Sharpie
Colorbox Chalk Ink
DIY Box- Sierra Pacific / Craft Warehouse
Thanks for stopping by! :)
For my daughter's Kindergarten teacher I made a plaque. I thought it could either make a good hallpass or just something for her to hang next to her desk...
Then my oldest daughter has two teacher's: One who teaches math and science and the other that focuses on reading and writing. It was fun doing one with a feminine take and one that was a little more masculine (which is seriously a challenge for me).
I LOVE this latest Hello Summer Collection designed by Lori Whitlock for Echo Park! :)For this one, you can see I used the scraps from the journal that I posted here. I had some strips left from the chevrons that I created and they were the perfect width for the sides of this little post-it note box! Love those happy discoveries! :)

Supply Lists:
"Miss Price" Plaque
Patterned Paper- My Minds Eye Sunny Side
Ribbon- American Crafts
Pearl & Rhinestone- Queen & Co.
Twine- Twinery Cappuccino
Flower- Prima
Colorbox Chalk Ink
Alpha Dies- Cricut
Unfinished Plaque- Sierra Pacific / Craft Warehouse
Ms. Tendler Mini Box
Patterned Paper & Stickers- Echo Park Hello Summer
Chick Stamps- Lawn Fawn Critters on The Farm
Twine- Twinery Mandarin
Ribbon- May Arts
DIY Box- Sierra Pacific / Craft Warehouse
Mr. Nadal Mini Box
Patterned Paper- Echo Park Note To Self
Thanks Stamp- Papertrey Ink Think Big Favorites #1
School Stamps- Technique Tuesday Ali Edwards I Love School
Red Ribbon- May Arts
Pen- Red Sharpie
Colorbox Chalk Ink
DIY Box- Sierra Pacific / Craft Warehouse
Thanks for stopping by! :)
Wednesday, May 30, 2012
A Layout & Card to share...
I have a couple projects to share today using the My Mind's Eye "Miss Caroline" Collection! After National Scrapbook Day at Craft Warehouse, they had several kits left from their make-n-take that day in which the customers made mini albums. It looked time consuming and I don't usually gravitate towards actually using my mini albums that I've made in the past so I had passed it up on NSD. However, when they offered for us to make the album or take the kit to use at Scrapbook club last month, I was intrigued by the idea of taking those supplies to make a layout that I could actually enjoy in my full-sized albums! As it turns out I had enough to make a layout and a card and it was SO MUCH fun! :)
To start with I had the following supplies to work with:
(2) 6x6 double sided papers from My Mind's Eye's Miss Caroline collection
(3) 3x6 double sided papers from My Mind's Eye's Miss Caroline collection
(1) Sizzix Tim Holtz Rosette Diecut
(1) unfinished title "adore" from American Crafts new DIY Thickers
(1) piece of My Mind's Eye baker's twine
(4) Misc. Buttons
And here is the layout I came up with...
Additional Supplies Used:
Kraft cardstock- Bazzill
Aqua Cardstock- DCWAV
Border Dies- Sizzix
Flourish Diecut- Silhouette
Oval Dies- Spellbinders
Butterfly Punches- Martha Stewart
Stamps- Technique Tuesday (you), Papertrey Ink Beautiful Butterflies (Birthday Sentiment)
Rhinestones- Heidi Swapp
Pearls- Queen and Company
Flower- Prima
Font- Scriptina (We)
Versafine Onyx Black ink
Colorbox Fluid Chalk ink
Copic Sketch Markers (to alter alphas)
Thanks so much for stopping by! :)
To start with I had the following supplies to work with:
(2) 6x6 double sided papers from My Mind's Eye's Miss Caroline collection
(3) 3x6 double sided papers from My Mind's Eye's Miss Caroline collection
(1) Sizzix Tim Holtz Rosette Diecut
(1) unfinished title "adore" from American Crafts new DIY Thickers
(1) piece of My Mind's Eye baker's twine
(4) Misc. Buttons
And here is the layout I came up with...
(I ended up altering my DIY Thickers with a yellow Copic Marker)
And this is a birthday card I made my Great Grandma with the leftover scraps...
Additional Supplies Used:
Kraft cardstock- Bazzill
Aqua Cardstock- DCWAV
Border Dies- Sizzix
Flourish Diecut- Silhouette
Oval Dies- Spellbinders
Butterfly Punches- Martha Stewart
Stamps- Technique Tuesday (you), Papertrey Ink Beautiful Butterflies (Birthday Sentiment)
Rhinestones- Heidi Swapp
Pearls- Queen and Company
Flower- Prima
Font- Scriptina (We)
Versafine Onyx Black ink
Colorbox Fluid Chalk ink
Copic Sketch Markers (to alter alphas)
Thanks so much for stopping by! :)
Saturday, May 19, 2012
Echo Park "Take Note" Projects
Hi there!
I thought I would pop in today to share some projects I did using one of Echo Park's newest lines "Take Note" designed by Lori Whitlock that we did for the Craft Warehouse design team this month.
For my first project we had the choice of decorating a journal or a little box so I chose the journal.

I created my chevron pattern by cutting each of the patterned papers into 5/8" strips and then adhering them to a piece of 8-1/2" x 8-1/2" printer paper on the diagonal. I did two pieces--one with the stripes facing one way and a second with the stripes facing the opposite way. After they were all adhered, I cut my finished sheets into 1-1/2" strips and set to work finding the strips that best related to each other. I think in a couple of the instances I had to cheat towards the end and cut a couple of my chevron stripe sections out of the remaining leftover pieces, looking for pieces that didn't have snips out of the peaks of the V's.
We were also challenged to create a layout using the viewmaster patterned paper as a focal point, as well as using the number stencil and vinyl rub-on in some way.
For my stencil I had the idea that I wanted to try some old fashioned dry embossing with it, but as I pulled out my lightbox, I quickly realized the clear stencil could not be seen through the dark patterned paper. At this point I tried using my die cutting machine to see if I could emboss it quickly this way, but I discovered as I originally suspected that the stencil (which is designed mostly for spritzing and masking) was too thin for this application. Finally, I remembered something I had done in the early days before home die cutting machines even existed--I colored in my stencil with a black sharpie and it worked like a charm. This made it dark enough to see through when using the lightbox and I was able to set to work with my stylist. Afterwards I swiped it with an ink pad to make the embossing pop. :)
I was able to cut out the tickets and postage stamp from two different patterned papers in the set. I then took small 1/8" and 1/4" hole punches to give them a more realistic look...
Well that wraps up my assignments for this month. Make sure to head over to the Craft Warehouse gallery here to see all the other gorgeous creations my fellow designers created this month (you can see their individual galleries by clicking on their names) or hop over at the Craft Warehouse blog here for a peek at other inspiring projects going on.
Thanks for stopping by. :)
Supplies Used:
Echo Park's "Take Note" Papers and Cardstock Stickers
Studio Calico Wood Veneer Embellishments
Tim Holtz Tiny Attacher
American Crafts Thickers
American Crafts Ribbon
American Crafts Ivory Twine
American Crafts Silver Glitter Brads
Queen & Co. Red Dot Washi Tape
Queen & Co. Red Rhinestone
Spellbinders Pennant Dies
EK Success 3/4" Circle Punch
Colorbox Chalk Inks
Black Pen
I thought I would pop in today to share some projects I did using one of Echo Park's newest lines "Take Note" designed by Lori Whitlock that we did for the Craft Warehouse design team this month.
For my first project we had the choice of decorating a journal or a little box so I chose the journal.

I created my chevron pattern by cutting each of the patterned papers into 5/8" strips and then adhering them to a piece of 8-1/2" x 8-1/2" printer paper on the diagonal. I did two pieces--one with the stripes facing one way and a second with the stripes facing the opposite way. After they were all adhered, I cut my finished sheets into 1-1/2" strips and set to work finding the strips that best related to each other. I think in a couple of the instances I had to cheat towards the end and cut a couple of my chevron stripe sections out of the remaining leftover pieces, looking for pieces that didn't have snips out of the peaks of the V's.
We were also challenged to create a layout using the viewmaster patterned paper as a focal point, as well as using the number stencil and vinyl rub-on in some way.
For my stencil I had the idea that I wanted to try some old fashioned dry embossing with it, but as I pulled out my lightbox, I quickly realized the clear stencil could not be seen through the dark patterned paper. At this point I tried using my die cutting machine to see if I could emboss it quickly this way, but I discovered as I originally suspected that the stencil (which is designed mostly for spritzing and masking) was too thin for this application. Finally, I remembered something I had done in the early days before home die cutting machines even existed--I colored in my stencil with a black sharpie and it worked like a charm. This made it dark enough to see through when using the lightbox and I was able to set to work with my stylist. Afterwards I swiped it with an ink pad to make the embossing pop. :)
I lucked out and my vinyl clock just happened to fit into my title right where there was a red polka-dot in the patterned paper below. Tried to tie in the number 5 in the patterned paper to my journaling. Love when it all works out. ;)
For my second layout, I used the spellbinder Pennants die to create the banner. It was a little too big to fit the number of banners I wanted going across so I made them smaller by cutting off the tops.
I was able to cut out the tickets and postage stamp from two different patterned papers in the set. I then took small 1/8" and 1/4" hole punches to give them a more realistic look...
Well that wraps up my assignments for this month. Make sure to head over to the Craft Warehouse gallery here to see all the other gorgeous creations my fellow designers created this month (you can see their individual galleries by clicking on their names) or hop over at the Craft Warehouse blog here for a peek at other inspiring projects going on.
Thanks for stopping by. :)
Supplies Used:
Echo Park's "Take Note" Papers and Cardstock Stickers
Studio Calico Wood Veneer Embellishments
Tim Holtz Tiny Attacher
American Crafts Thickers
American Crafts Ribbon
American Crafts Ivory Twine
American Crafts Silver Glitter Brads
Queen & Co. Red Dot Washi Tape
Queen & Co. Red Rhinestone
Spellbinders Pennant Dies
EK Success 3/4" Circle Punch
Colorbox Chalk Inks
Black Pen
Monday, May 7, 2012
Got Sketch? 5-year Anniversary Sketch Challenge
I am a sketch girl to the core. I love them and Valerie Salmon's sketches are always so inspiring so I decided to play along with her 5-year annivesary sketch contest. This one has a bit of a twist which is fun. In honor of the 5th anniversary, the challenge was to use 5 photos, 5 different patterned papers and 5 embellishments using this sketch...
Please excuse my poor photos. I don't know if it was the kraft paper or what, but my camera was having the hardest time capturing a clear image that wasn't too grainy for these.
Make sure to hop over and see more GORGEOUS takes on this sketch over at Valerie's Got Sketch? blog here. :)
Thanks for stopping by! :)
I had so much fun with this sketch and cutting and layering those circles out of the different sweet patterned papers from this beautiful Girls Paperie line.
For my five accent/embellishment requirement I used a Papertrey Ink Label from their Happy Day Stamp and die set, 2 buttons, pearls, ribbon, bitty flowers, a Spellbinders Pennants and a butterfly die (Papertrey Ink) and a butterfly punch (by Martha Stewart).
Once in a blue moon (for me) a layout just falls together so quickly and this sketch deserves all the credit! Thanks Valerie for letting me play along and for inspiring the layout! :)
Make sure to hop over and see more GORGEOUS takes on this sketch over at Valerie's Got Sketch? blog here. :)
Thanks for stopping by! :)
Labels:
Girls Paperie,
Layouts,
Papertrey Ink,
Silhouette,
Sketches,
vacation
Wednesday, April 25, 2012
Papertrey Ink's April Blog Hop
I so am happy to have found the time to join in with Papertrey Ink's blog hop this month! This month they challenged us to make a card using this very inspiring photo as a jumping off point.
And here is the card I created...
I was inspired by the roses and the aqua blues in the inspiration photo (I was also inspired by the pinks, but I needed to use the K&C epoxy element for another card challenge I'm doing for Craft Warehouse's stamp club so I went with coral colors for my accent color). ;)
Supply List
Papertrey Ink Pretty Peonies Stamp Set
Fillable Frames #5 Mini Stamp Set
Papertrey Ink Mat Stack 5 Die
Papertrey Ink Layerz Mat Stack 5 Die
K&Company Bloomscape Button Grand Adhesions
Girls Paperie Jubilee Papers
Copic Markers
Seam Binding Tape
Colorbox Chalk Ink
Versafine Vintage Sepia Ink
Ranger Adirondack Dye ink
Ranger Worn Lipstick Distress Stickels
Other: Thread & ivory cardstock
Make sure to check out more gorgeous and inspiring creations over at Nichole Heady's Blog here! :)
Monday, April 16, 2012
A "Carefree" Authentique Layout...
I had the pleasure of getting to play with Authentique's latest "Carefree" line a bit early! Earlier in the month I had so much fun attending a crop to meet all the Craft Warehouse design team members from present and past. During that time Elizabeth Wiederspohn brought us all some goodies that Authentique had generously shared with us!
Here is what I created...
Supply List
Patterned Paper- Authentique "Carefree"
Cardstock Stickers (photo corner)- Authentique "Carefree"
Lined Paper (for journaling)- Basic Grey's Basics
Script Alphas- American Crafts Thickers
Date Stamps- Making Memories
Circle & Border Punches- EK Success
Rhinestones- Doodlebug
Rhinestone Brad- Making Memories
Number dies- Papertrey Ink
Ink- Colorbox chalk ink, Versafine
Flower- Prima
Ranger Black Enamel Accents
Ranger Glossy Accents
Ranger "Diamond" Stickels
Other: Thread for stitching
Here is what I created...
The butterflies were handcut from a piece of patterned paper and then dressed up with Ranger's black enamel at the antenna and some diamond stickels on the wings. I also used some glossy accents on my diecut "34" to tie it in with the glossy thickers in the title. :)
Make sure to check over at Authentique's blog to see more of this collection here and thanks for stopping by! :)
Supply List
Patterned Paper- Authentique "Carefree"
Cardstock Stickers (photo corner)- Authentique "Carefree"
Lined Paper (for journaling)- Basic Grey's Basics
Script Alphas- American Crafts Thickers
Date Stamps- Making Memories
Circle & Border Punches- EK Success
Rhinestones- Doodlebug
Rhinestone Brad- Making Memories
Number dies- Papertrey Ink
Ink- Colorbox chalk ink, Versafine
Flower- Prima
Ranger Black Enamel Accents
Ranger Glossy Accents
Ranger "Diamond" Stickels
Other: Thread for stitching
Subscribe to:
Posts (Atom)


