Showing posts with label Craft Room Organization. Show all posts

Wednesday, March 29, 2017

Some of My Favorite Ways To Organize My Stash

Doodlebug Embellishment Craft Room Storage Tips by Mendi Yoshikawa


Hello there!  I'm popping in today with another peek into my crafty "woman cave" with a few of my favorite ways to stay organized.  The Doodlebug Team is sharing their rooms over the next two weeks and I thought I would join in the fun.  Just to keep things real, I must confess
 that I didn't have time to clean my space for the post so I've stolen these first few photos from one of my better days a couple years ago when I had completely reorganized.  While I do like a well organized space, my room hasn't looked this clean since then.  ;)


A Peek into Mendi Yoshikawa's Craft Room Studio

Snapshot #1: This first shot shows a little counter to the left of my entrance with a craft sink which just happens to be my favorite addition to my space.  It's been wonderful for cleaning up paint and ink projects.  My family likes to joke that all I need is a micro/fridge with a cot and I just might never leave.  ;)

Snapshot #2: The next photo shows my custom made movable island that has (4) 12x12 hanging file drawers on one side and shallow 12" shelves on the backside.  The cabinets to the right, along the wall make up my die-cutting station.  I love that I'm able to store all my dies in the cabinets there within arm's reach.

Snapshot #3: The next photo moves to the right of my die-cutting station and is the place where I spend the majority of my day.  It was important to me that my counters be 24" deep to give me extra storage space along the wall and still have room to work at my computer and assemble my cards & scrapbook pages when the keyboard is pushed out of the way. 

Shapshot #4: Moving along to the right again I have another seating area to keep my sewing machine out.  For those who know me, I love to sew on my paper craft projects so after years of balancing it on my washing machine and standing up to sew, it was really important to me to have a dedicated space for my machine.  I also store all my inks and stamping supplies in the cabinets in that corner (which due to my addiction has doubled in size since these photos were taken).

A Peek Into Mendi Yoshikawa's Craft Room Studio

The last storage spot in my space that I don't have a good picture for is two side-by-side closets to the right of my room entrance.  My closet doors swing open so I have added the Elfa Pantry Door Organizers from The Container Store to the insides where they can be hidden away. I'm seriously in love!  They can be customized in a dozen different ways--I was able to fit 8 hanging wire baskets on mine in three different size).  They're perfect for fitting extra embellishments and maximizing tight spaces that would otherwise be wasted.

Mendi Yoshikawa's Craft Room Embellishment Storage using Elfa Pantry Door Organizer

I like to use Doodlebug's Button Keeper jars to hold many of my small basic Doodlbug embellishments.  I sort them by color family and am really happy with how much space they save.  It's truly amazing how much extra room the packages were taking up and how much easier it is to dump them out in my hand and just pick the colors I'm looking for.  They also are a great fit with my Elfa medium basket.

Mendi's Craft Room Embellishment Organization using Doodlebug Button Jars

I'm using some some larger plastic jars that I got at Michaels several years ago to hold my Doodle twine (the Droppar jars from IKEA would also work nicely).  They are a great size for so many things (including sorting washi tape by color) and I am able to perfectly fit four of them in one of my large Elfa utility baskets.
Ideas for Doodlebug Craft Room Organization by Mendi Yoshikawa

Next up, I have some storage solutions using some of my favorite Interdesign / Linus clear acylic storage bins.  Most of these have been designed with the kitchen and refrigerator in my mind, but they are wonderful at organizing so much more.  I can't go to Ross, Marshalls or TJMaxx anymore without scouting to see if they got some new ones in stock.  I love to use THIS large 8" x 4" x 14.5" bin to hold my Doodlebug 6x6 Paper Pads.  I counted and I'm able to fit in 55 pads in one tidy space!  

To keep my loose scraps together with their coordinating pads I use THESE clear party favor bags which I trim down to 6" long and tuck under the front cover of each pad. 
Ways to Organize Your Doodlebug 6x6 Paper Pads by Mendi Yoshikawa


For my 6x12 Alphabet and Icon Cardstock Stickers, I use THIS 4" x 4" x 14.5" Freezer Bin.  It's a great length and they are easy to sort by color and theme.  Once again, I love that I am able to fit so much in a tight space and still quickly find exactly what I'm after.
How to Organize Your Doodlebug Stickers by Mendi Yoshikawa

Up next is a tip for storing Doodle Pops.  Hello my name is Mendi and I have a Doodle Pop addiction.  Linus Drawer organizers are so perfect for reining them in.  For my little dividers, I cut up some plastic file folders and rounded the corners with my corner chomper and then labeled them with my Brother label maker (which was completely inspired by how Jennifer McGuire stores her clear stamps).  ;)

Ways to organize your Doodlebug stickers & other small embellishments by Mendi Yoshikawa

To keep my Doodlebug sprinkles, jewels and pearls tidy I love THIS divided organizer.  It's just the right size for these and would work well for a variety of small embellishment packages.

How to Organize your Doodlebug Jewels, Sprinkles & Pearl Embellishments by Mendi Yoshikawa

Phew!  Are you still with me?  Thank you for joining me today.  I feel extremely blessed to have this special space after more than a decade of working from our dining room table (and storing my items in every room, but the bathroom).  With that in mind, I'm a firm believer in using whatever space you have to the fullest so I hope some of these organizational ideas will work for you whether you have a dedicated room or work from your kitchen.  


To see my previous "space" you can check out one of my very first blog posts I shared HERE (it's such a funny blast from the past for me).  While my surroundings have changed I still love and use all of the storage items I shared way back when.  ;)

Big Hugs!

Monday, October 26, 2015

Tsukineko Jumbo Dauber Storage Solution

I have a new love affair and it's with the Jumbo Dauber by Tsukineko.  Have you guys tried these out yet?  I have always struggled to get the beautifully blended backgrounds with my Ranger distress inks, until now.  

I started my love affair by dipping my toe in with 7 daubers (one for each color group), but it didn't take long for me to realize that I needed more (lots more so I took the plunge and recently ordered a 25-pack).  Then the "problem" arose with how I was going to store them... Enter cheap bead cases by Darice (seen HERE) that I found for $5 at Ross and I was even more in love (you can also find something similar in Michael's bead department).  I set the stacking bead jars that come in the case aside which I will use at another time and moved the daubers in.  


And here's how they look all snug in their case when closed.  Pretty darn perfect!  So for those who haven't tried these, I will try to explain why I think I love them so much.  Unlike other foam applicators they are sort of ball shaped.  That shape leaves little to no inky edges and lines in your blending.  It's pretty magical actually.  I think you won't be disappointed.  

I have heard several people say they wash theirs out and they come pretty clean, but I decided I didn't want to mess with waiting for them to dry between colors.


Here's a link to my Flickr album where I used them for all my recent Sunny Studio creations.  I have been so excited by my newly learned blending skill that almost every card started as a blank white piece of cardstock that I inked up to match my Copic coloring. ;)

Sunny Studio Stamps

For those who have these, I hope I've helped solve a problem with how to store them (this case is also the perfect size to fit in rows of the mini distress inks).  For everyone else, I hope you will give these jumbo daubers a try.  I'm not affiliated with the company who makes them--I'm just one very happy customer.  ;)

Monday, July 20, 2015

CardMaker Magazine- Stamp & Die Organizational Binders

I was recently honored to be asked to serve on the CardMaker Magazine's blog team for a 6-month term and today I'm excited to be sharing my first blog post over there.

They asked me to share an organizational tip and I had been saving an awesome one just for an occasion like this.  Make sure to head on over there as I share my new system that I adopted last summer.  I promise you won't be disappointed--I have been loving it!  :)


You can check out my full post HERE.  It's the perfect summer project and I can't believe how much time it has saved me in the long run.  ;)

Wednesday, January 7, 2015

My Creative Space with Organization Ideas- Part 2

Hello there!  Today I'm back with a continuation of my organizational post shared on Friday HERE.


As I continue to work myself around the room, we arrive to the area above my standing island.  I have installed a wall unit (similar to the one sold HERE).  Last year after getting tired of sifting through my flowers by brand I finally poured them all out on my floor and organized them by color.  While I don't find myself using these as much as I once did, I still love seeing the splash of color in my room and having them well organized when I do go to use them.  :)


I discovered Craft Mates containers about 10 years ago and I am a die-hard fan.  You can often find them in either the beading department or organizational products section at most major craft stores.  

I love them because they lock closed with individual lids to reduce spilling out (something I had to clean up in a giant messy pile one too many times at crops) and have nice rounded bottoms to make scooping out embellishments so much easier.  They come in two or three different sizes and are amazing for condensing down embellishments and shedding so many bulky packages that they come in.  I have four Craft Mate shoulder bags in two sizes which I store in the cabinet directly above my main work space to hold the majority of my embellishments and I love them!   :)

The larger 3XL size is perfect for bulkier embellishments like buttons and wood veneer pieces, while the smaller 2XL size is wonderful for brads, eyelets and sequins.  This picture shows the 3XL size...


This is a photo of the cabinet above my die-cutting machine.  I keep some of my older Sizzix dies in here as well as all my low profile metal dies sorted by theme and manufacturer.


I love We R Memory Keeper's (previously Quickutz/Lifestyle Crafts) magnetic storage books for my slim metal dies.  These are currently in short supply during the transition of companies, but by the looks of their website more are expected in the near future.  

I use my Brother P-Touch Label Maker with 6mm labels to mark what's inside each binder.  This makes my life so much easier.  For the longest time I couldn't find labels to work and I had to open each one to find what I was looking for, but I bought this label maker for myself for Christmas last year and now I'm a labeling fool. 

If you do get this Label Maker, definitely look up the instructions for using the "chain print" option to save valuable tape between labels.  ;)


Here's an example of two of the storage binders opened side by side to give you an idea of all you can fit inside.  They come with a magnetic flap (to the right of the photo) which closes over the top and keeps all the contents secure.  They are wonderful!  :)


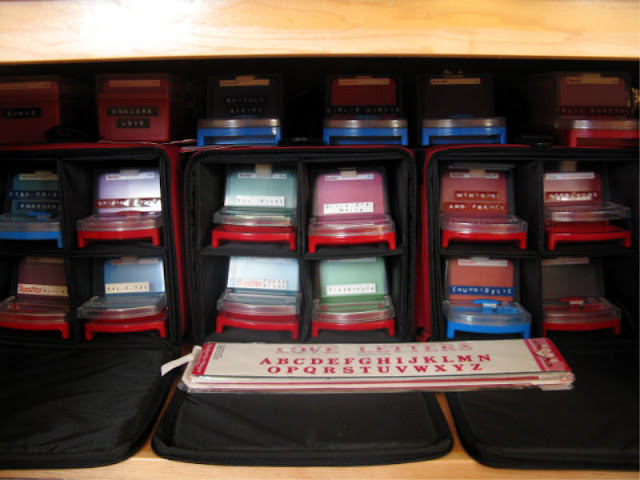
For my inks and refills (and Stickles) I'm a huge fan of the PortaInk Best Craft Organizers.  I personally use the standard case version with the standard ink inserts (perfect adapter which you insert for smaller pads that would normally get pushed to the back).  They also make a swivel version that's double sided with a handle, but I don't travel with mine and I like being able to push the units flat against the wall.  I should note they also have the ability to be mounted to the wall or to be laid flat in a drawer if your counter space is in short supply.

For the longest time, I had my pads stacked in containers and had to go searching through cascading piles to find the one I was looking for, but these units make life so much easier.  Of course I put my label maker to good use again as well.  ;)


To wrangle my growing (out of control) collection of inks I made myself a paint chip so to speak of each ink color which I keep on binder rings.  I have two rings for my dye inks and one for my pigment and Stazon inks, all organized by color.  On the back I labeled each chip with the ink manufacturer and color name to make matching inks to my particular project and patterned papers a breeze.

For the little samples in the center, I cut tags from thin chipboard and pressed them into my VersaMark ink pad before heating them up with my different colored embossing powders.

These projects while a bit time consuming initially saves me so much time each time I stamp.  I used to have to spend 15 minutes testing out a multitude of inks with lots of wasted paper trying to guess which color would be just right.  Now I am able to select the perfect ink or powder every time.  


My last little organizer for today is simple, but for whatever reason I didn't purchase it until recently.  These trays sit in the drawer directly below my sewing machine and they too make my life so much easier.  It's wonderful being able to open it up and quickly find the color I need without them rolling all over the place.  It keeps them tidy and not in a snarly mess too.  I purchased mine HERE at The Container Store and another one for my bobbins HERE at Joann's.


Well, there you have it.  I have a couple more organizational projects that I finished this past summer and fall I will be back to share with you soon.  

Thanks so much for stopping by.  I hope I've inspired you to catch the organizational bug this month!  :)

Friday, January 2, 2015

My Creative Space with Organization Ideas- Part 1

Hello and Happy New Year!  Today I am finally sharing a peek into my creative space which is way overdue.  I LOVE organizing and have been wanting to share for over a year now, but it just never seems to stay completely clean for very long.  LOL!  :)

It's far from the prettiest space out there, but it is extremely functional and I feel blessed to finally have it after so many years of work at a dining room table that spilled into every other room of our home.  


Here's an overall view of my different crafty corners within my room:


View #1: I made sure to install a sink which has been amazing.  It's actually just a basic utility sink, but I love being able to wash off my stamps and rinse out my cups there.  Since I'm in the basement next to our garage, we've also found it to be extremely helpful having it when doing things outside and coming in with dirty hands.  On the left side you can see a standing island which is on sliders. I wanted to be able to push it around my room as needed so I installed commercial carpeting in my room to make this possible.  

View #2:  On one side of my island (facing the sink) I have shallow shelves and on the other side I have (4) 12x12 hanging file drawers.  I use one to sort all my paper scraps by color.  Since doing this, I've found I actually use my paper scraps (amazing).  When I have older double sided patterned papers that I no longer love that come with a solid color on the back, I've started filing them in here and I've been amazed at how much I've used them up this way.  To the right is a counter height station for my die-cutting.  The cabinets above and below are filled with all my dies sorted by manufacturer.

View #3: This is looking from the other side of my island toward my computer and work space.  I generally create in the space in front of my keyboard and at my standing island.  I never realized how much I would love having a place to stand and work.  I actually have a tall bar stool hanging out on the other side of the island, but it rarely gets used.  It's padded though and it's my cat's favorite spot to curl up and take a nap.

View #4:  This corner is on the far right wall of my room.  It's where I keep my sewing machine and all my inks.  In the cabinets above the inks I store some of my clear stamps and all of my inky supplies like embossing powders, pens and such.

Up next... I have two closets with floor to ceiling shelves to the right of my door entering the room.  This is where I keep the bulk of my design team products stored by manufacturer and collection.  


Without a doubt my favorite investment for this space is my Elfa Pantry door storage unit which frequently goes on sale at The Container Store.  There are so many reasons I love this thing, but a few of my favorites is that it doesn't damage the door you are putting it on, it can move with you and can be 100% customized to fit your needs with the different baskets you purchase to go on it!

The Spice Rack Basket is perfect for holding twine and small jars of embellishments.  


The deep baskets are wonderful for holding wider jars.  I use these lightweight plastic jars to hold smaller spools of twine, packaged embellishments and my washi tape sorted by color.  I will actually be changing the way I store washi tape soon though which I will share when it's done.  ;)


One of my favorite ways to store small packaged embellishments, 6x6 paper pads and small stickers is using the clear Interdesign Linus containers.  You can pick these up at Amazon or by watching for them at your local Marshall's, TJMaxx and Home Goods stores.  

I love the ones with the dividers for keeping smaller packages tidy and easy to leaf through.  When I am working on a project I am able to bring the entire container to my workstation to find just what I'm looking for.


Below my shelves on the ground I have several of the inexpensive storage cubes.  My favorite is the 3-drawer unit which is the perfect depth for holding rolls of ribbon (don't judge me for all the duplicates--I picked them up for 75% off) and also just the right size for two stacks of thickers and other alphabet stickers which I have sorted by color.


I also keep the bulk of my clear 4x6 stamps in my closet in portable containers I picked up at an office store designed for lateral files.  I organize my stamps in 8.5 x 11 clear Fellowes binder sheets intended for CD storage and sort them by theme and/or brand in hanging file folders to leaf through.  With a little cardstock cut down to size, I can fit 4 sets in each sheet protector.  :)

This is an older photo I took of one of the binder sheets.  Several years ago I ordered a ream of this hot pink paper that turned out way more intense when I got it in person so now it's my go to paper for random uses like this.


Well, I'm going to break for today, but I will be back on Tuesday with the second half of my room.  Thanks so much for hanging with me .  :)

Wednesday, May 20, 2009

Organization!

I love to organize and nothing more than organizing my craft supplies (sometimes I think I enjoy this part as much as scrapbooking itself). It takes me back to getting new school supplies as a kid! Anyway, I recently reorganized the way I store my flowers, ribbon and cardstock so I thought I would share my recent accomplishments...

Here's the custom cabinet I had made to fit a little nitch in my dining room. I am constantly changing what I store in here, but it's been pretty flexible for me...


I've always liked to organize my Bazzill cardstock by color, but I had all these DCWAV Cardstock stacks off to the side that I kept forgetting to use so I recently tore all the DCWAV cardstock out of their pads and now they are mixed together so hopefully they'll start getting used up.
Snippets By Mendi: Custom Scrapbook Cabinet to Hide Craft Supplies in Dining Room

The cabinet has two of these filing cabinet drawers that I use to sort my patterned paper by manufacturer. It's been a great system for me.

12x12 Hanging File Cabinet Drawers for 12x12 Scrapbook Paper by Mendi Yoshikawa

I bought this as a Christmas present for myself and I am in love... I hung this in our laundry room and it's been wonderful having everything visible in one spot. However, after this project I realized I'm not allowed to buy anymore flowers, ever!

Snippets By Mendi: Paper Flowers Craft Storage Organization

This is the way my ribbon used to be stored...


This is a new system I've slowly been collecting made by Cropper Hopper. Most of my local stores discontinued them, but I picked up 5 extra drawers at Tuesday Mornings last month which I was escatic about. How did I think all my ribbon was going to fit in 3 drawers?! At my friend's suggestion, I removed them all from the cards they came on and sorted them by color to make them easier to use (except for the American Crafts spools which are still stored in the organizer shown above and some larger spools which are stored in the larger cropper hopper spool drawers). After this project I realized it's yet another supply I can stop buying...
Snippets By Mendi: Cropper Hopper Ribbon Spool Drawer Organizers

These white cubicles line my other dining room wall and are slowly taking over. I like to organize my stamps, chipboard, rub-ons, bling, etc. in the drawers and have my completed pages stacked on several of the shelves which really need to be moved to those empty albums that I've been stocking up on... Since I don't scrapbook in order I dread this part so I only do it about once a year...


That big black blob you see in the photo above is 3 of these craft mate organizers. This is another organizer that I am completely hooked on. I think most craft stores have them with their beading department, but they are awesome for sorting your brads, buttons, eyelets and other small embellishments. Each compartment opens individually and they have a rounded bottom making it easy to scoop things out. :)
Brads, Buttons and Eyelets Storage by Mendi Yoshikawa using Craft Mates Bead organizers

I don't know why I took this picture, but this is a spare cabinet in the kitchen where I store some extra diecutting supplies. I think I have something in every room of the house, except for the three bathrooms. Ha! :)

Sizzix Sizzlits Storage by Mendi Yoshikawa

Well, there ya have it. To my non-scrappy friends, first off I'm sorry... LOL. Hopefully if nothing else it inspires you to tackle your own spring organization project. It's very addicting! Make sure to leave a comment and share your favorite organizational tips. :)
Related Posts Plugin for WordPress, Blogger...