Thursday, June 19, 2014

A Technique Tuesday Card with Stamping on Cork

I've been busy trying my best to cross things off my ever growing "to do" list, but I wanted to pop in to share a card I made awhile back where I stamped and heat embossed on cork.  I used Technique Tuesday's Chevrons Two Step set  to stamp across 3 cork tags with Versamark ink and various American Crafts Zing embossing powders.


My tags were cut out using an old Sizzix Originals die which I set with We R Memory Keeper eyelets and topped with American Crafts twine bows.  I finished my card with a sentiment from another one of my favorite Technique Tuesday stamp sets called Simply You by Ali Edwards.  

It's a lot of fun experimenting with stamping on unusual materials.  I hope I have inspired you to try something new.  ;)

Monday, June 16, 2014

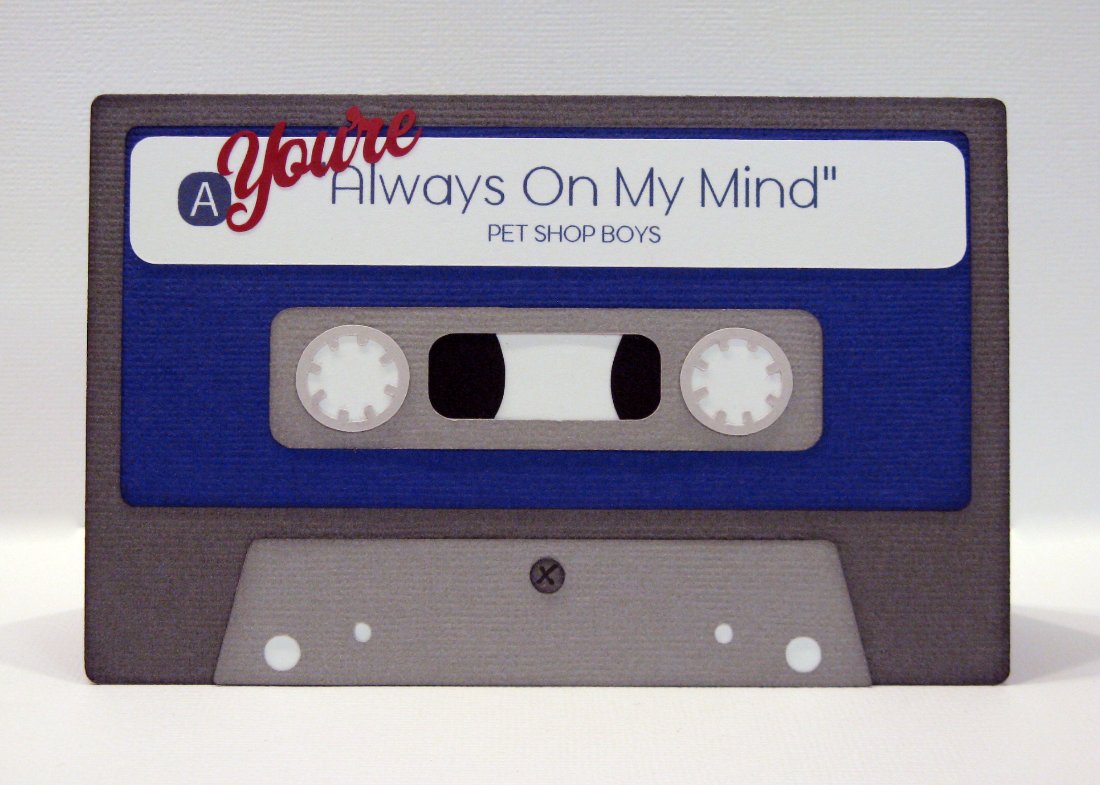
An 80's Retro Cassette Tape Card

Hi there!  I would like to apologize profusely for my repeated incorrect posting of a graduation layout.  I made this a couple months ago without knowing the date it would go live on Shimelle's blog and I keep pushing out the post date waiting to see it pop up, but with the busy days of school wrapping up I kept forgetting to push it out more.  I thought I had resolved it yesterday, but apparently not so I'm very sorry.  Hopefully it will be on her blog for real sometime soon.  ;)

I'm the meantime I thought I would share a card which was featured in the June issue of Paper Crafts and Scrapbooking magazine.  I made this for an article asking designers to focus on creating cards around a specific song and this is what I came up with using one of my many favorite 80's songs...


To create my card I used a "Retro Cassette Tape" by Sarah Hurley found HERE at the Silhouette store and sized my length to be 5-1/2" long to fit in an A2 sized envelope.

Thanks so much for stopping by and again my apologies for the repeated mix-up.  ;)

Thursday, June 12, 2014

The Last of My Jillibean Soup Card Kitchen Creations

Back today to share the last two cards from my guest spot over at Jillibean's Card Kitchen Club blog.  I think these last two were some of favorites.  ;)

For this card I cut the sentiment from a journaling card from the Bite Sized Bits paper and an airplane from the Pea Pods diecuts.  I chose to fussy cut and remove the white border from my diecut to give my design a more cohesive streamlined look.  I love that these diecut shapes can be used either way.  ;)


Up next I have a thinking of you across the miles sort of card.  I made this card with my Japanese mother-in-law in mind.  I had fun using the yellow seam binding tape for my bow with two heart stick pins that came with the kit.  For my sentiment I cut apart the same "thinking of you" sentiment in two different colors to better fit the vertical space on my card.


I can't leave without say a BIG thank you Jillibean Soup for inviting me to play along.  :)

I hope you've been inspired this week.  It was super fun and I enjoyed the challenge of creating of trying to only create with the one box of supplies.  I think we should all do that every once in awhile to stretch ourselves creatively.  ;)  

Tuesday, June 10, 2014

Lori Whitlock June Blog Hop: Fairy Princess Layout


Hello & welcome to Lori Whitlock's June Blog Hop!  Today I thought I would share a fairy princess layout I created using some older shapes of Lori's.  I came across this equally old photo of my daughters playing dress up from 7 years ago and was overcome with how much I wanted to pinch their little cheeks.  They're older and sassier now so got me feeling nostalgic for  the "good ol' days" of make believe and dress-up.  ;)


For my title I cut it out twice from both white and green and then cut away the extra words from the green so that I could break up the title a bit and accentuate the phrase "your dreams."


To create my scene I searched Lori's shapes for anything that would work as a princess and I came across her darling Tooth Fairy cutting file.  With the omission of a couple of teeth die cuts, I thought it worked perfectly!  

To dress her up, I added Glossy Accents to her eyes and Stickles glitter glue as trim (my favorite color is Stardust because it seems the best at matching any project).


I cut the castle out and accented with more of the stickles.  For my project I mixed and matched a variety of patterns from several different Echo Park collections including Lori's Hello Summer collection and different Dots and Stripes & Style Essentials collections.


To create my layout I used the following SVG cutting files by Lori:


In honor of today's hop, Lori is generously offering 30% off at her store through June 16th.  


Be sure to check out all the other inspiring projects at my fellow teammates blogs and leave them some love.  Brigit is your next stop in the hop.  :)

Thanks so much for stopping by! 

Monday, June 9, 2014

A Couple More Jillibean Soup Card Kitchen Creations

I'm back to share two more of my cards from  Jillibean Soup's Card Kitchen Club.  :)

For my first card I wanted to focus on using the darling kraft tickets from the collection.  I cut the word "snap" and the camera from one of the journaling cards on the Bite Sized Bits paper.  I love that the letters fit perfectly and made a super cute banner with the help of some bakers twine!


My next card used the word "snap!" and the camera from the Pea Pods diecuts, pairing it with some matching camera patterned paper from the collection and some pearls to add a little dimension.


The little cameras were some of my favorite icons from the collection so I had a lot of fun making both of these.  I'll be back later in the week so share my last two cards.  Thanks so much for stopping by!  :)

Friday, June 6, 2014

A Hello Kitty Layout with Doodlebug's New Sequins!!!

I have a layout up on Doodlebug's blog today featuring a new favorite:  SEQUINS!  I'm sure I'm not alone when I say I am in love with these.  There are so many fun ways you can use them and I love that Doodlebug's bottles come in so many colors with so many variations within each bottle!


I thought for my layout it would be fun to create a radiating design where the sequins started out more tightly placed and then got further apart as they move away from the circle.


To achieve this I started by adhering the bubble gum sequins about 3/16" apart (I just eyed it) along my die cut circle using Ranger's Glossy Accents.  I found that this adhesive worked well and was easy to apply in small amounts as I went.  I also discover after it dried I could easily flick off the beads of glue that oozed through the hole of some of the sequins.  As I progressed I just slowly set them further apart as I moved outward.


To complete my layout and create my visual triangle, I embellished with some Velvet Hydrangea flowers by Petaloo and topped them with Lily White Jewels.

If you haven't already, run to your nearest store and grab these.  They come both as larger bottles and in an awesome (and adorable) assortment pack.  The Doodlebug team will be sharing lots of cool ways to use these over the next two weeks so make sure to watch their blog.  ;)

Thursday, June 5, 2014

More Jillibean Soup Card Kitchen Creations

I'm back today with a couple more cards that I created as the June guest designer for Jillibean Soup's Card Kitchen Club.  their blog.

For this card I wanted to showcase all of my favorite prints from the collection so I chose a diagonal design and cut my papers into strips, sewing the edges of some of them with my sewing machine.

For my bow I used the wide organza ribbon in the kit, folding in half and then doubling it for the band that wrapped around the card (to reduce the opacity).  I made the actual bow separately, folding the ribbon back and forth and then gathering it in the center with a little needle and thread.  I then folded the last of my ribbon twice and knotted it around the center of my bow, hiding my knot in back.  When I was done, I just used some strong adhesive to adhere my bow to the other band.


For this card I lined up the office tags to form the base of my design.  I removed the twine that they came with and tied them with some baker's twine from the kit.  After adhering them to a piece of sunny yellow chevron paper I cut the word "happy" from the Bite Sized Bits paper and finished my design by embellishing with stars from the Pea Pods diecuts and some pearls from the kit.


Totally easy peasy, yet I think still fun and happy.   Check back tomorrow for a fun layout I created using Doodlebug's SEQUINS!  ;)

Wednesday, June 4, 2014

Jillibean Soup Card Kitchen June Guest Designer

I was honored when Kimber asked me to be a guest designer for Jillibean Soup's Card Kitchen Club this month.  If you haven't heard of them they are a fun club that sends you a new coordinating kit of supplies with enough paper and embellishments to make 8 cards each month (with enough extras to squeeze a couple extra cards or a layout).  This month's kit focuses Jillibean Soup's Sightseeing Stew collection and today I have two of my eight cards to share on their blog.  On a side note, aside from chalk ink and thread, every single paper and embellishment I used on my cards came with the kit.  :)

First up I have a card where I lined up 6 arrows from Pea Pods diecuts along the right side of my card.  I paired it with the coordinating arrow paper from the collection and a sentiment from the Pebbles Phrase sticker sheet.


Next up I thought it would be fun to use a 3/4" circle punch to punch the numbers from the filmstrip patterned paper to create a grid design across my card.  To add some interest I punched 5 extras to pop up with foam tape in a random pattern.  For my sentiment I cut new v's on each end of the Pebbles pennant sticker so they would match and the sentiment would be centered.  I thought it would be fun to write or type of a sentiment inside that said something to the effect of "Age is just a number..."


Check back tomorrow when I'll be sharing a couple more cards using this fun kit.  :)

Tuesday, June 3, 2014

A Lori Whitlock Ice Cream Birthday Party Layout

Hello there!  I am excited to share a  layout with you that is up on Lori Whitlock's blog!  I've always had a thing for cute ice cream cones so I was happy to finally be scrapbooking my daughter's 4th Birthday when she decided to forgo the typical cake or cupcakes and just have ice cream.


For my title I paired Lori's Perfect Type font with her Happy Birthday Banner.  I was tickled to discover I could spell out the word "party" instead by using just select letters from the "Happy Birthday" phrase.


For my ice cream embellishment I used the ice cream cone from her Patriotic Icons set with a cherry borrowed from her Cupcake Banner Set.  To finish off my layout I used a tab from the 7 Tabs set.


On a side note, I used darling papers from Doodlebug's Sugar and Spice collection.  I loved how well they matched my photos and theme--I think they're so versatile considering this is actually a baby girl collection!

Thanks so much for stopping by and for the sweet comments that have been left.  They always make my day!  :)


Monday, June 2, 2014

A Technique Tuesday & Disney Little Mermaid Banner Layout

Hello there!  Today I have a layout to share that I created for Technique Tuesday with a focus on their fun and versatile banner dies. Company owner Bev Grey has created a quick little video showcasing some of the many ways you can use these dies on their website HERE.


For this layout I wanted to have the banners take center stage so I used a white on white approach for my background.  I die cut two border strips from white cardstock on my Silhouette and THIS polka-dot print to mimic the look of bubbles.  I love the texture and extra detail it gives my project without adding a lot of visual distraction.


For my banners I decided to cut them in a variety of aquas and lavenders to compliment my photo and layer them in an offset pattern to create the look of the Little Mermaid's scales.  I then stamped them with the coordinating banner stamp, using it as a guide to pierce holes for my hand stitching.


These stamps and dies are a lot of fun and are a great staple to any crafter's arsenal.  To create my layout I used the following products:

Other coordinating banner stamp sets include:

Thanks for stopping by.  :)

Related Posts Plugin for WordPress, Blogger...