Friday, January 29, 2016

Doodlebug Sweet Things Valentine's Day Scrapbook Layout

I am thrilled to be sharing a layout on the Doodlebug Blog today using the adorable new Sweet Things collection!   I have been waiting for a collection with both hot pink and red to match these photos for six years now so I was thrilled to finally find the perfect papers to use them with!


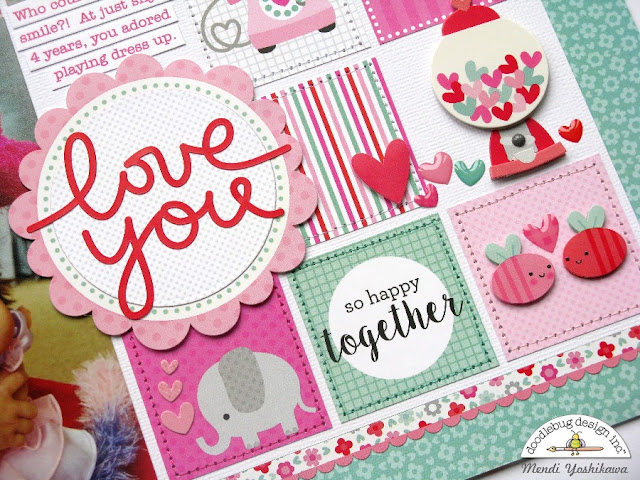
Doodlebug Sweet Things Valentine's Day Scrapbook Layout by Mendi Yoshikawa

I am so in love with all of the darling images in this collection so I wanted to find a way to showcase as many of them as possible and a grid layout seemed like the perfect solution!  I cut each square from the tiny valentine's paper down to 1-7/8" x 1-7/8", lined them up on my 10-1/8" square piece of white cardstock and stitched around them in coordinating colors of thread.


Doodlebug Sweet Things Valentine's Day Scrapbook Layout by Mendi Yoshikawa

For a couple of the squares, I layered the coordinating icon stickers over the top with foam tape to create the look of a doodle pop.  I also removed a couple of the squares in my grid and filled the space with actual doodle pops from the collection for a little variety.  


Doodlebug Sweet Things Valentine's Day Scrapbook Layout by Mendi Yoshikawa

I hope I've inspired you to document a special memory of your own using this fun collection! 


Interested in the products I used to create my projects today?  To make supplies easier for you to find, I have listed them below (affiliate links included). 

Supplies Used (available at Scrapbook.com)

Thursday, January 14, 2016

Doodlebug Polar Pals Snowflake Winter White Tree

Hello there!  I'm was so excited to kick off the new year over on the Doodlebug blog earlier this week with a special wintry tree using Doodlebug's new Polar Pals collection!  

I've packed away my Christmas decor, but I picked up this fun little tree for a bargain at my local craft store (made by Doodlebug a number of years ago) that was just begging to be decorated for the winter season.  I love that the white color could also transition and work well Valentine's Day and Easter too with a simple change in ornaments!


I wanted to create a special topper for the top of my tree so I pulled out my mini doilies in swimming pool, blue jean and lilac to make a pleated topper (using THIS tutorial as a starting point).  I layered it with a die-cut snowflake and one of the blue snowflakes from the Snowflakes Craft Kit and a silver star from the Graduation Star Sprinkles.


For several of my ornaments I die-cut a mini Polaroid frame (found here) and then layered them with word stickers from the This and That sticker sheet (cutting little V's in them to turn them into pennants).  To fill this frame I used the adorable husky from the Winter's Night patterned paper sheet.  I finished off my ornament with one of the mini clothespins.


For my next ornament, I punched out (12) 1-3/4" circles from two different patterned papers and then folded each of the circles in half.  I adhered them all together in a stack, alternating colors.  Before adding adhesive to the final side to form the sphere, I sandwiched a bit of twine looped through a button on the bottom down the center of my ornament.  I finished it off by knotting another button on the top and leaving plenty of twine to tie my ornament on the tree.


For this little Polaroid frame I used a doodle pop from last year's Frosty Friends collection and secured a mini paper clip in the top to string my twine through.


For another set of ornaments I die-cut coaster material using THIS snowflake die and then cut the same snowflake out with some of my favorite tone-on-tone prints from the collection.  I then strung them with twine and layered a snowflake sprinkle topped with a glitter sprinkle to the centers of each one.


For my star ornaments I die-cut 10 small stars from two or three different patterned papers and then used my Martha Stewart score board to score them down the center and fold them in half.  I then assembled them in much the same way as the sphere, adding a little twine to the center to hang them by before closing up the last side.


Yet another little Polaroid, this time using the penguin sticker from the icon sticker sheet.  Such a cute little guy!  :)


For my last set of ornaments, I die-cut some circular tags (found HERE) from some more coaster board and then again from the patterned papers in the collection.  I layered my tags with snowflake stickers from the icon sticker sheet and topped with snowflake sprinkles and glitter sprinkles.


I had fun creating my own ornaments and decorating this little tree using all my favorite Doodlebug supplies.  I hope I've inspired you to do some DIY decorating of your own!  :)


Interested in the products I used to create my projects today?  You can find the following products at Scrapbook.com (affiliate links included)


You can also find some of the items at Simon Says Stamp Here:

Related Posts Plugin for WordPress, Blogger...