Thursday, February 28, 2013

Lori Whitlock's February Blog Hop

Welcome to Lori's Fabulous February Blog Hop! Today the design team is featuring Lori's great page templates available in both digital and SVG cutting file formats.
 
For my layout I was immediately drawn to her Summer Season Layout available in her shop HERE (or in a digital version at Jessica Sprague's HERE).  Starburst designs can be tricky to calculate and I love that this file has it figured out for you! 
 
Another thing I love about this sketch is that it works great as just a one page layout if you prefer and the great thing about buying "layout" cutting files is it's like getting 5 shapes in one!  This one layout has a starburst pattern, a hot air balloon, 2 different clouds, a title and a wave border that could be used on lots of other projects! 
 
These templates have lots of flexibility too.   For my layout I wanted my photos to face towards the center so I removed the title and mirrored the rest of the design in order to flip it.   I also used a slightly different photo arrangement to match pictures I already had on hand.    


I used Lori's new "All About A Boy" collection that she designed for Echo Park and I have to say I'm smitten.  I don't actually have boys, but I was totally drawn to this collection.  I think it has tons of great basic colors and prints that will work for all types of projects (I must remember to stock up on the denim) and I am head over heals in love with the new washi tapes they are now making to go with their lines.  This blue chevron/arrow one is my new favorite--I love how the white stripe disappears on the background and takes on the look of arrows (it would have taken me forever to do this with diecuts and get them all lined up just right). 
 
The starburst cutting file is designed to be one piece and to be cut from a sheet of 12x12 piece of paper to make your life easy, but I knew I wanted to cut them out of lots of different patterns so I used the knife tool within my Silhouette software to cut them apart (sort of like spokes on a wheel so that I would know how to reassemble them).  I then separated them by numbering and counting out the rays by 6's and then separating all the #1's into a pile and all the #2's into a pile, etc. so I could cut each color out all at once and save a bit on paper (although as you can see from the awkward shapes some of them still used a fair share.  On a side note, for papers that had a stripe or grid pattern, I tried to only turn the shapes in 90 or 180 degree angles to keep them looking consistent on my layout.  To save even more paper you may consider using patterns where this doesn't matter.  Here's a screen shot of what the shapes looked like after I separated them out:
 
Hope this helped you understand my process a bit better.  I'm so happy you hopped by. Make sure to check out all the others girls wonderful layouts by clicking on the links below and then hop back to Lori's Blog telling her what project you loved or were inspired by for a chance to win a $20 Gift certificate to her store!  :)
                      
Lori Whitlock
Natalie Graham
Corri Garza
Joy Dickson
Lisa Bell

Monday, February 25, 2013

A Kaisercraft Secret Admirer Layout

What better way to celebrate the end of February than to share a sunny layout?!  Hopefully we will be seeing Spring flowers soon because I am sooo ready!   :)


I made this layout in response to a scrapbook challenge at my local Craft Warehouse store.  They provided us with a 12x12 sheet of yellow cardstock (challenging to say the least), a 1/2 sheet of Kaisercraft's Secret Admirer Mystical paper and one doily cardstock cutout (mine was aqua).  I purchased an additional sheet of Secret Admirer Coy paper and then used snippets from a couple other ancient paper lines by Fancy Pants and Little Yellow Bicycle.


I hand cut the largest doily out from the "coy" paper while my daughter was home on a sick day.  She was insisting that I stay in bed with her so I had some time to do some serious fussy cutting.  LOL! 


My layout design was "inspired" by a sketch over at Page Maps by Becky Fleck.  My two bookplates were cut from grungeboard (remember that stuff?) and matching patterned paper using some Red Sizzix Original dies. My yellow cardstock was stamped with a polka-dot background stamp by Hero Arts and then distressed with pink chalk ink to tone down the yellow glow.  ;)


Thanks so much for stopping by!  Hope you have a fun weekend!  :)

Thursday, February 21, 2013

A Pebbles Inc. Milestone Birthday Card

I just realized I never got around to sharing a birthday card that was published in Paper Crafts magazine's January-February 2013 issue!  :)


The call was for milestone birthday cards and I just happened to be trying out for the Pebbles Inc. design team at the time so this card pulled double duty for me.  Actually come to think of it, I made this for my little sister's 30th birthday this June so it actually did triple duty!  Sadly I didn't end up making the team, but I had 2 of my 4 projects picked up for publication so it definitely was a silver lining.  :)


The number dies and matching sentiment stamps are Papertrey Ink and can be found here and here

I also finally got around to adding a link to my Pinterest boards at the top right of my blog to make it easy to find me.  I am constantly pinning inspiration I find at all the blogs I frequent daily so make sure to check it out from time to time or become a new follower.  ;)

Thanks so much for stopping by and for the sweet comments that have been left.

Monday, February 18, 2013

A Project Life Grid Style Layout

Hi there!

For Lori's blog today, I thought I would  give her awesome Life Card cutting files a try.  I don't actually keep a Project Life or December Daily album, but I just knew these fabulous little cards would also work well for a grid style layout.  Personally I love linear designs so I have always been drawn to this type of layout anyway.


These photos have been sitting in my photo box for over 3 years now.  Honestly I was having trouble finding the perfect paper to match my daughter's red dress and that glowing hot pink hat, but then it hit me that I could do a monochromatic layout!  And who does this color of fuchsia better than Doodlebug?


When I saw these life cards I knew I would love to try cutting them out with a white tone on tone approach--almost making them appear as if they were embossed.  What I wasn't sure about was which color I would like to use for my background.  I actually tried white, kraft, grey and black before coming to chocolate brown!  The grey was too cool of a color for my photos and the black was too stark, but as soon as I slid the brown in it felt like just right for the amount of contrast I was looking for.


I love how the layered white cards add a lot of texture and detail without overwhelming my layout visually.  I finished my layout off with some machine stitching and stamping with my favorite Technique Tuesday stamps by Ali Edwards.  :)


For This project, I used the following cutting files:
Banner Flag Set
Valentine's Set
3x4 Life Cards
3x4 Life Cards Collection
'You Melt My Heart' Phrase  (Silhouette Store)
Border Strip Layered  (Silhouette Store)
4 Button Set (Silhouette Store)
Arrow Set  (Silhouette Store)
3 Circles  (Silhouette Store)
Hearts  (Silhouette Store)

Thanks for stopping by today!


Thursday, February 14, 2013

Happy Valentine's Day!!!

Happy Valentine's Day!!!  :)


I thought I would share a last minute, quick card I made for a monthly card challenge that I participate in at my local Craft Warehouse store.  For this card we were given a sheet of 6x6 paper from Bo Bunny's new Love Letters collection and the pink bow with self-adhesive. 

As I was pulling things together I realized it matched perfectly with some Bo Bunny Valentine's Day papers I had from years ago and some ancient Scrabble tile stickers that I just knew someday I would need (circa 2003).  LOL!   I paired them with Technique Tuesday's recently re-released stamp set "Adored" by Ali Edwards.

I was in a hurry so to speed up the process I thought it would be fun to scraplift a card from Pinterest.  This card by the amazing Betsy Veldman totally caught my eye!   You can check out some inspiration boards I have put together here.  I have started adding new pins to them daily with ideas I find at various blogs I frequent--Pinterest is such a great way to keep all your inspiration in one spot (and not clog up your hard drive like I was doing).  ;)

I hope you all have a wonderful day surrounded by those you love whether is be a significant other, kids or even your girlfriends.  I'm not sure if we will do something special yet or not...  My husband is Japanese and believes in taking the kids everywhere including anniversary dinners, Valentine's dinners, etc.  Going on romantic vacations as a child-free couple is something we've yet to do, BUT I am determined we will do it for our 25th (which is still a distant 8 years away).  Anyway, maybe it's time we start some sort of new Valentine's Day tradition.  Any suggestions?  I would love to hear how you spend your Valentine's Day.  :)


Wednesday, February 13, 2013

Quick & Easy Last Minute Valentine's Day Cards

How's it going?  Are you scrambling for last minute Valentine's Day cards?  If so I have a couple quick and easy cards to share today.

I think I created this first one in record time.  I seriously am a slow paper crafter, but I want to say I did this one in a matter of minutes!


Washi tape makes things super quick and easy.  I just cut the white cardstock square, lined up my first red polka-dot tape on the diagonal, lined up the remaining rows, folded over the edges.  The heart was diecut with a large heart punch and then I realized it might be cute to punch it again with a smaller heart and pop it up in the center.  The Love You Forever sentiment is from Papertrey Ink's Think Big Favorites #11 stamp set.  The base is just a simple scalloped rectangle that I cut two of on my Silhouette, scoring a 1/2" from the top and then adhering the two pieces together along that 1/2" section.

This second one uses the exact same sketch (found in the January/February 2013 issue of Paper Crafts magazine), but this time with a little more detail...


For this card I used BoBunny's Double dot papers and diecut multiple hearts arranged on the diagonal.  I then followed that with some machine stitching over the top.  My sentiment is taken from that same Papertrey Ink's Think Big Favorites #11 stamp set.  I had a chipboard heart laying around gather dust so I decided to cover it in matching paper as my focal point with a stitched border to tie it all together.  All in all a very fun sketch to play along with!  :)

Thanks for stopping by!

Monday, February 11, 2013

An Echo Park Love Story Valentine's Card & Box

I'm back today with my last Echo Park Love Story project to share which is also being featured on Lori Whitlock's blog today!  I have just loved all the different patterns in this collection and how it can be played up to be bold and sassy with the animal prints or soft and sweet with the florals!


My jumping off point from my projects today was a leftover piece of the lattice heart diecut that I had from one of my previous layouts (as a result of being indecisive about what color I wanted it cut from).  I realized the shape of it was almost a perfect match for the heart found on the 3x4 cards found on one of the sheets of paper from the collection.  From there I added a little snippet of a border, an XOXO's diecut sentiment and a bow and I was done.  This is another card that came together very quickly, but I love the way it turned out.


The lattice heart almost had a feel of a cherry pie to me which put desserts on my mind.  Then I realized I had this cake box file that I still hadn't found the time to play!  It was so fun to make and decorate!   I added a row of rhinestones to cover the seam, some glitter Stickles to the filling and then thought the perfect finishing touch would be one of Lori's rolled flowers.  The only trouble is I honestly have struggled in the past to get other rolled flowers to look just right when cut from stiff cardstock so I decided to diecut a pattern!


I cut the flower out of cardstock, pinned it to some felt, cut it out (minus the mini scallops) and rolled it up with some dots of liquid glue in between!  It was so easy! A couple of green leaves and it was just the finishing touch I had envisioned!


For these projects I used the following cutting files:
Cake Slice Box
3 Hearts
3D Flower (for leaves)
Rolled Flower Set 1
Valentines Set

I'm also so excited to have a couple projects that I created for Lori Whitlock's design team tryouts that I previously shared here and here published and the issues are now available for purchase at the links below or at a newsstand near you. ;)

Create: Mini Album Idea Book Spring 2013
Simply Handmade: Parties 2013

Thanks so much for stopping by!  :)
 

Friday, February 8, 2013

Valentine Card Ideas With Baker's Twine & Ribbon

I have a couple Valentine Day card ideas I made using a variation of the same general idea. 

Both of these cards were made in response to a publication call using a sketch found in Paper Crafts January/ February 2013 issue.  The sketch called for a 3x2 grid of 6 items and for my design I went with hearts diecut on Silhouette using the negative space left once the hearts were cut out.  I liked using the Silhouette for the task (versus a punch or diecut) because I was able to have perfect alignment without a lot of fuss.

This first one went together extremely fast.  I just taped some ribbon down to the backside, added a bow to the front with my sentiment, stitched around the perimeter and adhered it to the card base.  I can totally see mass producing this card for all sorts of occasions!  :)


This second one took a bit more time, but not nearly as much as you may think.  Because I kept the hearts above and below each other the same color, I was able to add 3 rows of sticky adhesive between the hearts and just attach small sections of baker's twine behind each heart. 


The thickness of the baker's twine added some bulk so afterwards I added a bit of thin chipboard to the back of the card front (where there was no twine) to keep the center from being higher than the rest of the card. I like the clean and simple design of this one. It has a more of a graphic feel than my typical style, but I like it. :)

Hope you all have a completely AWESOME weekend filled with lots of rest, relaxation and crafty time!

Thursday, February 7, 2013

A Valentine's Day Sale at Lori's Shop

Hi there!
 
Just thought I would pop over to tell you about a great sale going on over at Lori's shop today through Valentine's Day!!! 


She has added so many awesome shapes in the last month or two!  You can check out her store HERE.

Happy Shopping!  ;)


Wednesday, February 6, 2013

A Trio of Kid Themed Valentine's Day Cards

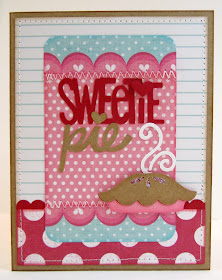
Today I have a trio of kid themed Valentine's Day cards to share that I made using We R Memory Keeper's darling "Love Struck" collection from last year and some super cute Silhouette diecuts designed by Kristen Magee (otherwise known as k.becca).


This first one uses her adorable bear with heart paired with her coordinating bear hugs phrase.  I then used Papertrey Ink's heart border die which I outlined with a white Signo Uniball gel pen.  I love how it turned out to look like the bear was holding one of the hearts from the border.


The second one uses her darling Bumblebee and matching Bee Mine phrase.  I added a little sparkle to his wings with Stickles Glitter glue and a very light shade of copic markers to give him some rosy cheeks.


This last one uses her pie paired with her sweetie pie phrase.  As you can see I kept the designs simple and similar in style, letting the themes take center stage.  I love her sweet images paired with her punny phrases--They will be so perfect for my girls on Valentine's day!  :)

I hope I've managed to inspire you a teeny bit.  ;)

Monday, February 4, 2013

An Echo Park Love Story Card & Heart Top Box

Hi there!

It's Monday again which means I have another Lori Whitlock design team project to share using the amazing Love Story collection that she designed for Echo Park!


I was left with a negative image from the Damask Hearts cutting file that I cut for last week's layout so rather than throw it away, I decided to pair it with a fussy cut  label from the paper collection and create a quick and simple Valentine's Day card with it.


And a Valentine's Day card is not complete with out some Treats to go with it so I cut a coordinating box using Lori's Heart Top Box SVG cutting file.  Both these went together so easily and yet I think they will go a long way to brighten someone's day!


I decided to try cutting out the box without the scored cuts this time by ungrouping the shape and just cutting the outline.  I liked that Lori provides them though because they gave me a visual aid of where it needs to fold. Afterwards I pulled out my Martha Stewart scoreboard and scored the lines with a bone folder and I love the clean look it gave the box!  I think I will be definitely doing more of that in the future. 

Thanks so much for stopping by!  Your comments always bring a smile to my face!

Friday, February 1, 2013

A Valentine's Day Card Idea for Your Man

For today's Valentine's Day card I thought I would share something a little more playful.  I created this card in response to Paper Craft magazine's call for Valentine's Day cards for men and of course this is where my imagination led me...  LOL!  :)


The shape of the card was cut out on my Silhouette using a cutting file created by Jamie Koay called Girly Set found here.  I then created a shadow of that shape and cut two of them to form my card base.  They are joined together at the straps and scored so that only the bottom portion opens and closes.  I then created the eyelet lace trim by using her assorted bunting decorations found here and adding a bit of Stickled glitter glue to the open dots.  The mini sentiment was stamped with a Papertrey Ink stamp set.  The red polka-dot paper is by Canvas Corp.

Thanks for stopping by!  Hope you all have a wonderful weekend!  I'm going to a church crop with girlfriends tonight and I am so excited for the escape.  ;)