Showing posts with label Hero Arts. Show all posts

Sunday, December 15, 2013

Day 19- An Argyle Christmas Card

I'm back with another card today using everyday supplies for a trendy holiday card.

I mixed some basic stripes and polka-dots from Canvas Corp. and Echo Park, cutting them into diamonds using a Spellbinders die.  To create my stitched argyle pattern I cut an extra diamond to use as a template with a paper piercer, making sure to center it between the diamonds.  After my holes were poked I hand-stitched the lines with a needle and embroidery floss (a great activity to do while watching TV).


My Supply List


I hope your day is awesome!  Thanks for stopping by.  :)

Thursday, December 12, 2013

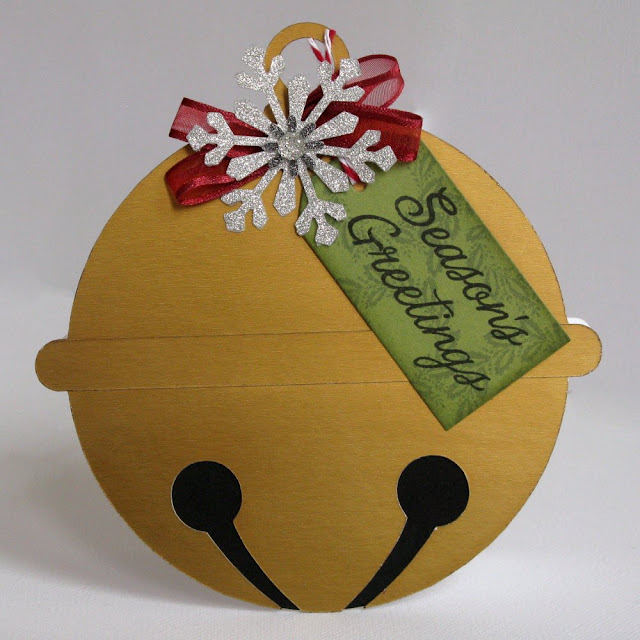
Day 16- A Jingle Bell Shaped Christmas Card

Hi there!  Today I have another shaped Christmas Card to share.  By now I think it's no secret how much I LOVE making these.

I thought it would be really fun to cut a jingle bell from metallic paper on my Silhouette Cameo, but in an effort to conserve this precious commodity I decided to create my card base first from white cardstock and then just add the metallic piece to the top.  This also had the added benefit of being able to sandwich some black cardstock behind the bottom portion of my bell.


I finished off my bell with a Papertrey Ink Fillable Frame #9 tag diecut from Echo Park's This and That Christmas Poinsettias Paper and stamped my sentiment using Hero Arts Joy To All Stamp Set.  The snowflake was punched with Martha Stewart's Himalayan Snowflake Punch from American Craft POW glitter paper and topped with a Queen & Company Twinkle Goosebump.  Wow!  That was a mouthful!  ;)

Thanks so much for stopping by.

Wednesday, December 11, 2013

Day 15- A Teresa Collins Christmas Cottage Card

Another day, another card.  :)

Today I used some more of my Teresa Collin Christmas Cottage scraps to create a tradtional themed Christmas card.  For this one I wanted to play with my Tim Holtz Tattered Poinsettia die that I picked up last year and never got around to using.  What I love most about my Sizzix dies is that they can cut through so many materials.  I decided to pull out some thick craft felt to lend a little texture to my card.

This design would be so easy to mass produce.  You just might want to rethink the felt and bulky pearl in favor of materials with a lower profile to fit through the mail.  ;)


My Supply List
  • Cardstock- Craft Supply
  • Patterned Paper- Teresa Collins Christmas Cottage (tiny flowers, sentiments)
  • Borders Strips- Teresa Collins Christmas Cottage
  • Pearl- Teresa Collins Christmas Cottage
  • Washi Tape- MT Masking Tape (Shippou Beni)
  • Die- Sizzix Tim Holtz Tattered Poinsettia
  • Stamps- Hero Arts Joy To All
  • Ink- Versafine Onyx Black
  • Felt- Kunin Rainbow Classic Felt (ruby)
Thanks for hanging with me today.  :)

Thursday, December 5, 2013

Day 9- A Hero Arts Reindeer Themed Christmas Card

For today's card I was excited to finally use my adorable reindeer stamps by Hero Arts that I bought a few years back.  The Holiday Cheer cling stamps come as a fun set with coordinating sizzix dies.

For this card I wanted to capture a sense of movement so I decided to have them leaping around a snowy globe of sorts.  To get three to fit on a card though I had to switch to a larger 7x5 card base. I couldn't find just the right sentiment to capture the mood of these happy guys so I created my own on my Silhouette Cameo with red vinyl (and my printer).


To color my little guys I cut 6 of them, stamping 3 with a black Memento Ink and coloring in with Copic Markers.  For the other 3, I stamped them again with red and green pigment ink, cutting off the bodies and layering over my other images.  Since the sweater portion of the image is solid this is a great way to escape being forced to have a gray sweater.  I finished off my card with some Stickles glitter glue over the polka-dots for a little sparkle.

Supplies Used:
  • Cardstock- Bazzill (navy), Neenah (solar white)
  • Stamps & matching Dies-Hero Arts / Sizzix Holiday Cheer
  • Ink-Memento (tuxedo black), Colorbox Pigment (Moss Green, Cranberry)
  • Pens- Copic
  • Red Vinyl-Silhouette
  • Fonts-KG As The Deer & KG Love You Through It
  • Glitter-Stickles “Frosted Lace”
  • Red Rhinestones-Kaisercraft
I can't help but smile when I see these reindeer.  I hope they bring you holiday cheer!  :)


Thursday, August 23, 2012

Hero Arts Enjoy the Ride Bicycle Card

Hey there!

Are you guys enjoying your Thursday?  There's something so magical about Thursday's knowing that Friday is right around the corner.  :)


My card today is yet another one I created for a past Craft Warehouse stamp club challenge.  For this one they gave us the B&W circle print ribbon and asked us to incorporate a round theme into our card.  Well, I took their request fully to heart and used layers of scallops, a circle frame and a bicycle stamp repeating the circle motif in the wheels.  :)

Supplies Used:
Patterned Paper- Bo Bunny
White Cardstock- Neenah Solar White
Black Cardstock- Craft Supply
Bicycle Stamp- Hero Arts
Sentiment Stamp- Papertrey Ink
Circle Dies- Spellbinders
Scallop Punch- EK Success
Flower- Prima
Brad- Making Memories
Markers- Copic
Ink- Colorbox Frost White


Thanks so much for dropping by! 

Monday, August 20, 2012

A Basic Grey & Hero Arts Butterfly Card

Happy Monday!  :)

Did you have a great weekend?  We enjoyed some time with family visiting and last night I happily discovered a patch of wild blackberries in the field next to us.  I had so much fun picking and eating.  I'm hoping to go again this evening so I can get enough to make some blackberry milkshakes.  Mmm...

So this week I thought I would share some cards that I've made in recent months that I never got around to sharing. 


This is a card I made using a Hero Arts Butterfly Stamp, my copic markers and a mini 6x6 paper pad from Basic Grey's Green at Heart collection.  I started by selecting my papers and coloring my butterfly to match.  I stamped and colored two images--Diecutting one with the spellbinders label and fussy cutting the second one out and gluing just the center portion down which all allows the wings to flap a bit to reveal the other butterfly below.  

For the butterfly that was stamped on the diecut label, after coloring the image with the pens, I stamped and cut a mask to cover the butterfly and then used distress inks with a foam applicator to give the label a soft background which blended better with the papers than the stark white cardstock it was originially stamped on.


Supplies Used:
Patterned Paper-Basic Grey Green At Heart 6x6 pad
White Cardstock- Neenah Solar White
Butterfly Stamp- Hero Arts
Sentiment Stamp- Papertrey Ink "Butterfly Dreams"
Border Punch- Martha Stewart
label die- Spellbinders
Ink- Distress Ink, Versafine Onyx Black (sentiment)
Rhinestones- Kaiser Craft
Ribbon-Craft Supply
Other: Copic Markers

Thanks for stopping by!  :)

Monday, August 1, 2011

A Happy Bumblebee Card

My oldest started her first day of overnight church camp today.  At least for now my ears are enjoying the vacation from screaming and fighting between her and her little sister, but I wanted to hurry up and make her a special card to mail her while she's at camp.  She's extremely shy and after over 3 years at our church she still hasn't found a little girl to connect with.  Last year she went and was miserable (they took an entire bus full of kids, but there was no other girl in her grade and she hated the food and the dirty gross bathrooms).  This year they're trying a new camp and it was a super tiny group--only her, 2 other girls and 2 boys so I am hoping and praying that is the perfect combination for her to finally make some lasting friendships at church.  She actually tends to fall back from large crowds so it may be just what she needs.  Anyway, I thought I would share the card I made her today...


I did a tiny bit of airbrushing on the white background along the edges with my copic marker to sort of help frame the image. The papers are completely ancient scraps I found in my scrap file--In fact the scalloped edge was left over from some picture frames I had made earlier out of the same paper. I ended up tracing the edges with a sharpie over a piece of scratch paper to give them the same outlined feel as the stamped images. Stamps are by Hero Arts "Be Happy" stamp set. Glossy Accents and stickels glitter glue were added to the butterfly wings and flower center.

Thanks for peeking. :)

Tuesday, June 21, 2011

A Sympathy Card...

I'm finally getting around to sharing a card I made for my dear friend who lost her mother to a brain tumor a few months ago.  I can't imagine the pain she is going through...


I started by stamping the flowers with Memento ink and then colored the stripes using a Copic marker just a shade darker than the cardstock.  I then topped off the stripes with the Stardust Stickles glitter and for the center layered glossy accents over the stickles for a shiny center.  I don't know if these two flowers were really supposed to go together (they were released at separate times), but they were just screaming out to me to be layered so I popped them up with a little foam tape between them for some added dimension. 

Complete Supply list:
Basic Grey Cappella 6x6 Paper Pad (CAP-2411)
Bazzil Cardstock
Hero Arts Large Flower Cling Stamp (CG134)
Hero Arts Small Striped Flower Cling Stamp (CG256)
Hero Arts With Sympathy Clear Stamps (CL476)
Spellbinders Fleur de Lis Doily Accents (S5-042)
Copic Marker (to shade flower stripes)
Ranger Stickles Stardust Clear Glitter Glue
Ranger Glossy Accents
Colorbox Chalk Ink
Memento Rich Cocoa Ink
Scotch Foam Tape

Thanks for stopping by!  :)

Sunday, June 5, 2011

Some Teacher's Gifts and Cards

I have some teacher's cards and gifts to share tonight that I made over National Scrapbook weekend. For these I challenged myself to use SUPER DUPER old school themed products that I came across when I was cleaning out my stash. I don't know why, but for some reason I had trouble parting with this particular stuff even though it's older than dirt so I decided it was time to finally put it to good use.

Each of my daughter's have two teachers so I decided to save time and energy by recreating the same card 4 times. For the paper, pencil and ruler border, I used Hero Arts "Just A Note" clear stamp set.

One on of the crop days at the Vancouver Craft Warehouse they gave us these $1 chipboard cover notepads in our goodie bags as a challenge to decorate. Many of use took a screw driver to them to remove the post they came with and put them on a binder ring instead. They turned out to be so quick and easy to personalize and a great way use up some of those ancient supplies.

On our other crop day, Craft Warehouse presented us with the challenge to decorate these $1 wood plaques. These turned out to be my favorite surface to alter. I had fun personalizing them so they could be used as a decoration in their classrooms or even as a hall pass.


And that Red bow motif you see on all 4 projects... They were all re-purposed red ribbons from Gymboree's Holiday gift boxes! Love that! Another clever ribbon re-use idea is cutting the ribbon handles off of store bags before recycling (I do this often with Ann Taylor loft bags) or the ribbons at the shoulders of your sweaters (ya know the ones that are supposed to hold your sweaters on the hangers, but instead pop out when you're wearing them). I love taking these and turning this trash into treasures on my cards and projects! :)

Tuesday, April 12, 2011

A Lollipop Birthday Card

Today I'm sharing another card which I made when I was challenged by my local scrapbook store to make a card using the pinking circle diecut and this hot pink brad on a card somehow. I chose to create a cheerful and fun shaped card using the Sweet Lollipop card template by Silhouette America.


After I cut out and adhered all the pieces, I went over the swirl with Stickles glitter glue. The inside Spellbinders pinking circle was stamped with a Hero Arts Scalloped circle stamp and the cute sentiment is from the Fillable Frames #1 series by Papertrey Ink.

Thanks for stopping by. Tomorrow I will try to set a new personal record by posting yet again. For those friends and family that subscribe, but don't scrapbook (wink-wink) I apologize in advance. :)

Thursday, July 15, 2010

Hero Arts Thinking of You Girly Princess Cards

Just thought I'd share a couple cards I made to mail to Sydney and Hayley who are Japan with Daddy for 13 days. Made use of a my huge hero arts order I placed several months back. I just love these!

I also made an extra one of the "hug" cards to mail to Jennifer for Grace. Info on her card drive can be found here


I also made this special magnet for Grace to include in her card using the Spellbinder die, hero art stamps, an old advertisement magnet and LOTS of paper glaze. I loved making it, but there was a huge learning curve for me with the paper glaze. It's so wet that it completely distorted my cloud stamp and grass stamp to look like some odd dreamy airbrush technique (note to sell: next time use Memento ink for everything). My second problem came in trying to move it to a better place to dry (away from my cat who likes to sleep on the table where I work). After painstakingly removing all air bubbles (and spending more than an hour on it up to that point) it fell and faceplanted into the carpet. Eak! I didn't know what to do first--Save the carpet which had blue and green paper glaze bleading into it or trying to salvage this project. The butterflies were added to hide where I stuck my finger in trying to see if it was dry (smack myself in the head). In the end I think it still turned out cute, but I will know better when I make more for my own girls. :)


Thanks for stopping by. :)

Saturday, January 30, 2010

A simple set of Children's Get Well Cards

I am in love with Jennifer McGuire's blog. I am convinced if I lived in Ohio we would be great pals (LOL). Well, she has this awesome card drive for sick children who need some cheer in their lives so I finally got around to making some cards to send over to her. Check out her blog and card drive at www.jennifermcguireink.com


The insides say "Owls you feeling today?" and then a personal message to them.

Thanks for stopping by. Off to make some more cards. :)

Sunday, January 17, 2010

Knee Deep in Valentine's Day Cards

Well, right around Christmas I was officially overcome with a cardmaking obsession. Honestly I've never really had a passion for making cards, but at the last minute our Church decided to have a craft bazar and I thought it might be fun to make cards to sell. Well, it didn't take long for me to realize I wouldn't have enough made in time so I sat this year out. BUT, for next year I thought if I could make about a dozen each month I would be ready without too much panic come next December. Apparently it turns out I'm not capable of doing anything half way so I have been in a word OBSESSED (so much so that I was overtaken with an idea for Christmas cards so now I have finished my cards for next year--Woo-Hoo!) Anyway, I recently came to the conclusion that I will have way too many cards to sell in a 1-day Bazar so yesterday I sat down and opened a "store" at Etsy and I sold my first card this morning. :D
You can view my store front at http://www.etsy.com/shop/snippetsbymendi

Here are a few of my favorites that I produced assembly line style this week:


Supplies: Hero Arts Stamps (Cupcake/Polka-dots), CK Puppy Love Font, Copic Markers, Stickles & Diamond Glaze.

Supplies: Hero Arts Stamp, Copic Markers, American Crafts Paper, Fiskars Border Punch, Stickles, Diamond Glaze.


Supplies: Hero Arts Stamps (Hugs & Kisses, Birds & Stripes), Versafine Ink, Stickles, BoBunny Paper.
I am completely in love with Hero Arts new stamps! I have a mile long wish list. I bought these birdies on an impulse buy yesterday. They weren't even on my list, but when I saw them this card idea popped into my head. I also treated myself to this striped background which I saw in their catalog can be turned into checks just by stamping it in two directions. So clever!
The Copic Markers were one of my Christmas presents to myself. They're a bit on the expensive side, but I'm head over heals in love (and I'm actually using them vs. collecting them). If you haven't heard of Copic Markers I would highly recommend checking them out. Here are a few of my favorite websites I found on them:
This is just a good general question and answer website: http://debbiedesigns.typepad.com/muse_and_amuse/FAQs_on_Copic_Markers.html
Here's the cheapest place to buy them and they offer free shipping on Sketch Marker purchases over $100: http://www.carpediemstore.com/listCategoriesAndProducts.asp?idCategory=24
Here's a great website who also sells them and her color recommendations are awesome: http://www.ellenhutson.com/servlet/the-971/COPIC-Sketch-Marker-Sets/Detail
I like this site's color recommendations too: http://www.papertreyink.com/acc_copics_sketchmarkers.html
Here's a cool website that did a test using the markers with different inks and papers: http://ilikemarkers.blogspot.com/search/label/paper
Happy Crafting! :)

Thursday, November 19, 2009

A Long Overdue Update

I'm seriously sheepish that it has taken me 4 months to update this blog with a new post. I'll try my best to touch on a few of the highlights of each month...

EARLY JULY
After we got back from Japan I took this awesome online 9-week FREE class called "Thinking Inking" by Jennifer McGuire over at twopeasinabucket.com. She completely opened my eyes to a whole new world of stamping, inking and painting on my projects. Here are a few of my favorites that I made practicing the techniques covered:

Faux Watercoloring with Distress Inks
Playing with Ranger's Crackle Paints

More Crackle Paints and Diamond Glaze

Alcohol Inks (butterfly cut with Silhouette Machine)

Dripping Alcohol Inks

Alcohol inks on clear tag/ Stamped Flourish with Stazon

Applied Rub-ons on clear plastic Heart and then applying alcohol Inks

Heat Emboss and Crayon Resist with Distress Inks

Heat Embossed Resist with Distress Inks

For anyone who loves to dabble in anything crafty I highly recommend popping on over at 2peas to check out her class or doing a search for "Jennifer McGuire" on you-tube. She's so talented and fun to watch!

Camping at Honeyman State Park- July 23~26

Moriah's Brother-in-law brought his ATV and Moriah and I rode together. This picture of us was taken just as our tires lifted on off the ground and we were screaming our heads off. So fun!


Daria being goofy in Moriah's tiny RV tub...

Enjoying some Smores


Hittin' the Beach...


LATE JULY & ALL OF AUGUST
I was busy preparing an insane number of auctions for the Back-to-school shopping rush. In fact it was my largest undertaking in my history with Ebay with over 1200 items. Needless to say my August was spent being overwhelmed with trying to keep up and very little sleep inbetween. Here's a photo of some of the chaos in early August (this is actually before I added in about 10 more bags from the garage). LOL.


SEPTEMBER
Around labor day Hayley, Yoshi and I came down with symptoms similar to the swine flu without perhaps the severity (like my fever only lasted for 2 days vs. 1 week), but it was followed with a month of feeling generally cruddy. It took all of us awhile to get over it, but with the abuse I had been putting my body through for 6 straight weeks, I think it hit me harder.

Sydney's First day of Third Grade:


Hayley's first day of Preschool:


A few pictures from Sydney's 9th Birthday (a slumber party):


OCTOBER
After 3 years of gaining weight and honestly being a bit embarrassed to face my doctor I finally made an appointment with her and I'm so glad I did! To my delight she diagonosed me with Hypothyroidism and prescribed me some much needed medication. I have been so relieved to know the cause of for my fatique, dry skin, hair loss and extra weight! Woo-Hoo!!! Sadly I'm still waiting on some results but she said it could be 6 months before I feel the effects so I'm holding my breath and crossing my fingers. LOL! :)

A Visit to Lee Farms on October 11th


Some pictures from Hayley's 4th Birthday Party on October 17th


The girls dressed up as matching "Poodle Girls" from the 1950's for Halloween and Sydney's friend, Emily was Hannah Montanna.


NOVEMBER
My month has been spent making Christmas cards, selling Holiday Dresses and pajamas on Ebay and just kicking back enjoying our new Netflix subscription. I have fallen in love with Ally McBeal all over again. Man, I forgot what a good show that was! And being able to watch movies and TV series instantly on my TV (with that magic ROKU box) all for the bargain price of $8.99 a month has made me a huge fan of theirs! I've been trying to talk Yoshi into turning off our dish for a month to see if we miss it, but funny enough he's doesn't want to live without it now (funny because I had to beg him to get it in the first place when we moved here).

Well that just about brings us up to date. I love hearing from you so make sure to leave a comment to say Hi. :)
Related Posts Plugin for WordPress, Blogger...